Reshmi Patel • March 1, 2022

Popular Finger Patterns for Piano Players

How do we know which finger patterns to use when playing the piano?


Since there are various patterns for different areas, we recommend taking this one step at a time. Remember that you don’t need to learn ALL of the patterns right away. It’s completely normal for these to take time. In this blog post we’ll be sharing the different steps you follow to work out the finger patterns in music.


Each finger is labelled from 1 – 5 on both the right-hand and the left-hand. As seen in the image below, both thumbs are finger 1 and numbers 2 – 5 then follow in order.

For beginners, we encourage students to play on Middle C and show them the C Major scale for one octave. We recommend starting off with basic scales with no black or white keys as they can then focus on the basic letter names and finger pattern which will then become apart of their muscle memory which can support them as they increase the difficulty of the scales and pieces.


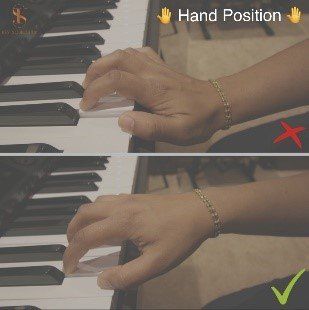
1)     Natural Hand Position


The natural hand position is when we put our thumb on Middle C, 2 on D, 3 on E, 4 on F and 5 on G in our right-hand. For our left-hand we would put our thumb on Middle C, 2 on B, 3 on A, 4 on G and 5 on F.


In this hand position if both hands are playing, our thumbs are turned onto their side and share the Middle C note. To create this shape with ease, try to imagine placing your hand on your knee or holding an apple, with a loose grip.

2)     Posture


Often, we see beginners thinking of hand position and posture as two separate elements when it comes to sitting at the piano, when in fact they do have an impact on one another.

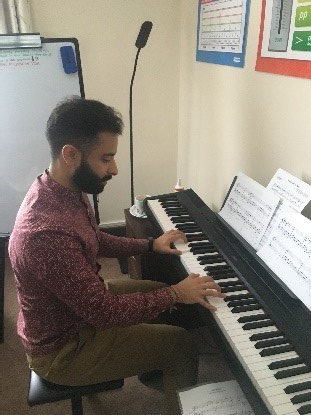
The image below shows the correct posture. In this image the student is sitting in the middle of the keyboard, with relaxed shoulders to avoid our arms tightening and restricting our movement. Th student is also sitting at an appropriate distance which creates close enough to a 90-degree angle at the arm to avoid tension and to reach the centre of the keyboard with ease. When we are moving across the keyboard, we would lean our body across in this same position rather than moving our stool.

3)     Scales


For most scales which are one octave, when we are ascending, which means moving from LEFT to RIGHT on the keyboard we will use the following finger pattern for your right-hand it will be 123 then we tuck our thumb under our 3rd finger to then play followed by 12345. For our left-hand it will be the opposite which is: 54321 then our 3rd finger crosses over our thumb and we play 321.


Similarly, when we play two octaves, we will use the finger pattern for our right-hand which is 123 we then tuck our thumb under and play 1234, we then tuck our thumb under and play 123 and finally we tuck our thumb under to play 12345.


When we are descending, which means we are moving from RIGHT to LEFT on the keyboard, we complete the patterns in reverse order.


4)     More complex finger patterns


Once you’ve come to grips with the more basic scales you can move onto the more complex scales. The more complex scales involve playing a different finger pattern as they use more black keys.


5)     Chord patterns


Whilst there is a variation of chord patterns the most common finger positions in the right-hand for a 3-note chord in root position is 1, 3 and 5 or 1, 2 5. Whereas for the left-hand also in root position the finger position would be 5, 3 1 or 5, 2 1. These patterns tend to vary based on how often you will play the black keys, hand flexibility and shape.


6)     How to take the first step once you’ve learnt scales and chords


Once you’ve mastered steps 1 – 6. There are basic sight-reading books where you try these patterns out for yourself!


We highly recommend checking your hand position, finger position and posture with a qualified piano teacher or mentor to see if they think these are the ideal patterns for you to use.

Remember that when you are trying out these hacks to look at them little and often but also be patient with yourself. If you wish to know more about these hacks and resources, feel free to take a look around our website or connect with us directly!

By Reshmi Patel December 22, 2025
Every child learns piano for different reasons and their goals can (and should!) reflect who they are. Some children love structure. Some crave creativity. Some enjoy performing, while others prefer playing quietly for themselves. Understanding the different pathways available helps parents support their child more confidently and avoid unnecessary pressure. 1. Every Child’s Musical Journey Is Unique There isn’t a single “correct” goal for piano. Children can learn for: ● Fun ● Confidence ● Academic benefit ● Creativity ● Examinations ● Performance opportunities ● Emotional well-being Sometimes one goal leads into another and that’s part of the magic! 2. The Most Common Piano Goals (and How They Help) Creative Development Improvisation, composing, arranging popular songs Benefits: imagination, confidence, emotional expression Skill Building Technique, fluency, accuracy Benefits: discipline, brain development Performance Confidence School concerts, family recitals Benefits: public speaking confidence, resilience Exam Pathway (Optional) Grading Benefits: structured progression, sense of achievement Well-being and Relaxation Playing for joy and calm Benefits: mental balance, stress relief Actionable Tip One Ask your child: “What do you enjoy most about the piano?” Their answer often reveals what their goals naturally should be. If you’d like help identifying what motivates your child, feel free to message us - we can offer insight based on how they learn in lessons. 3. Choosing the Right Goal for Your Child’s Age and Personality Here are some ideas but please note these are not fixed as it does depend on the personality, strengths and goals of your child. Ages 5–7: Short wins, fun pieces, confidence-building Ages 8–11: Structure, pieces they recognise, balanced challenge Ages 11–14: Identity, creative choice, performance opportunities Teens: Style exploration, exam strategy, personal expression Actionable Tip Two Create a simple “one-term goal” together: Examples: ● “Learn two pieces I love” ● “Perform at the next school concert” ● “Take my Grade 1 when I feel ready” ● “Compose a short melody” One achievable goal can dramatically boost motivation. 4. Goals Can Change (And That’s Healthy!) Children go through phases - more academic pressure, emotional changes, shifting interests. Their piano goals should evolve with them. This is why regular communication with your teacher is so important.  If you’re unsure what goals suit your child best - or you’d like help setting motivating, realistic targets - you’re welcome to message us anytime. We love helping parents understand what’s right for their child.
December 19, 2025
Christmas is a time for family, fun, and a much-needed pause from rigid routines. If your child learns the piano, you might be wondering how to keep music ticking along without it feeling like yet another thing to manage during an already busy season. The good news? Piano progress doesn’t stop just because formal practice looks different. Small, intentional musical moments can go a long way especially for children aged 6–8. Here are three simple, low-pressure ways to support your child’s piano learning over Christmas. 1. Reframe “Practice” as “Play” One small word change can make a big difference. Instead of saying “Go and practise the piano”, try: “Can you play me something on the piano?” “What would you like to play today?” “Can you show me your favourite part?” Why this helps: Children associate play with freedom and enjoyment It removes the pressure of “doing it right” It encourages curiosity rather than resistance Ask your child to play one thing only - even if it’s just 30 seconds. A tiny win keeps confidence high and avoids overwhelm. 2. Use Everyday Listening to Spark Musical Interest You don’t need to be musical to support your child’s ear for music. Listening to piano-based music in the car, while cooking, or during downtime helps children absorb rhythm, mood, and musical patterns naturally. Try: Film soundtracks with piano Calm pop songs featuring piano Instrumental background music during quiet time How to make this interactive (without a lesson): “Does this sound happy or calm?” “Is the piano playing loudly or softly here?” “Would this be fast or slow to play?” These simple questions build musical awareness without sitting at the piano at all. 3. Turn Music Theory Into a Game Theory doesn’t need to feel formal - especially at Christmas. Short, playful theory moments can actually strengthen understanding and help your child feel more confident when they return to lessons. Easy ideas: Flashcards at the breakfast table A 2-minute quiz before bed “How fast can you name these notes?” challenges Keep it light: No correcting every mistake Celebrate effort over accuracy Stop while it’s still fun Set a timer for 2–5 minutes only. Ending early keeps children keen rather than tired. A Final Thought for Parents If the piano looks different over Christmas, that’s completely okay. What matters most is that: Your child feels positive about music The piano remains a friendly, familiar space Learning continues in small, manageable ways These gentle approaches help children return to lessons feeling confident not behind.  If you ever want ideas tailored to your child’s age or level, we’re always happy to help support. Please feel free to reach out if you have any questions!
By Reshmi Patel December 15, 2025
Choosing the right piano teacher can shape your child’s enjoyment, confidence and long-term progress. A great teacher doesn’t just teach notes; they inspire, guide, encourage, and adapt to your child’s needs. Here’s what parents should look for when choosing a piano teacher. 1. A Teacher Who Understands Children, Not Just Music A brilliant performer doesn’t always make a brilliant teacher. Your child needs someone who understands learning styles, motivation and confidence levels, age-appropriate expectations, and emotional development. Good teaching feels like support, encouragement, and clear direction rather than pressure. Actionable Tip One After each lesson, ask your child one simple question: “What did you enjoy most today?” Their answer will tell you a lot about whether the teacher understands how to make learning feel positive and age-appropriate. If answers become consistently negative or vague, feel free to reach out to us for guidance. 2. A Teacher Who Communicates Clearly With Parents Parents should never feel in the dark about their child’s learning. A great teacher explains what your child is working on, why certain pieces are chosen, how practice can be supported at home, and how progress is developing over time. A teacher who welcomes questions helps make the whole journey smoother. Actionable Tip Two Set aside one minute after lessons to quickly note what the teacher mentioned or demonstrated. Even a short note, such as “Focus on left hand this week”, helps you stay connected and gives your child consistent support at home. If you’re unsure about anything, you can always ask us for clarification. 3. A Structured, Thoughtful Approach to Progress Children thrive when their learning is organised and tailored. A high-quality teacher provides a clear pathway of progression, goals matched to your child’s age and personality, a healthy mix of repertoire that includes classical, pop or film music, and a balance between fun and skill-building. Exams are offered as an option when appropriate, not a pressure. Actionable Tip Three Try a termly mini check-in with your child’s teacher. Ask three simple questions: 1. “What skill is my child currently developing?” 2. “What’s going well?” 3. “What can we support at home?” This keeps learning aligned, clear and motivating. Great teachers welcome these conversations, and we are always happy to talk with you. 4. A Teacher Who Understands Local Expectations Parents in Stanmore, Edgware, Canons Park and Hatch End often prepare children for the 11+, value discipline and routine, seek activities that build confidence, and prefer structured learning. A teacher who understands your local culture and expectations can support your child more effectively and tailor lessons with these needs in mind. Actionable Tip Four Share your family’s educational goals with the teacher at the start of the year. Whether you want improved confidence, support during 11+ preparation, or a balanced creative outlet, this helps the teacher shape lessons that truly complement your child’s wider development. If you’re unsure what goals would suit your child, feel free to ask us.  If you want to understand what high-quality piano teaching looks like or whether your child’s current lessons are meeting their needs, feel free to contact us. We are here to help guide you toward the best experience for your child.
More Posts